Entrance Announcement
MICTE 2080
2080 Magh 07
User:Elina Real Teaching lesson Plan 17: Difference between revisions
Jump to navigation
Jump to search
mNo edit summary |
No edit summary |
||
| Line 21: | Line 21: | ||
* Chart paper and markers. | * Chart paper and markers. | ||
* Individual sheets of paper and pencils for each student. | * Individual sheets of paper and pencils for each student. | ||
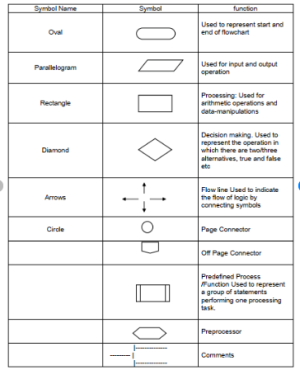
[[File:Symbol of flow chart.png|thumb|Symbol of flow chart]] | |||
== Introduction == | == Introduction == | ||
| Line 47: | Line 48: | ||
== Hands-On Practice: == | == Hands-On Practice: == | ||
* Ask students to create a flowchart for a process of calculate volume of cube in copy. | * Ask students to create a flowchart for a process of calculate volume of cube in copy. | ||
* Write an algorithm and draw a flowchart to print natural number from 1 to 10 and find their sum. | |||
* Emphasize the use of different shapes for different components. | * Emphasize the use of different shapes for different components. | ||
* Walk around the class to provide assistance and guidance. | * Walk around the class to provide assistance and guidance. | ||
Latest revision as of 06:57, 4 February 2024
| Subject:Computer Science | Class:8"A" |
|---|---|
| Unit:18 | Topic:Flowchat and its component |
| Period:7th | Time:45min |
| no of student:64 | School:Adarsha Secondary School |
Specific Objectives[edit | edit source]
- Students will able to understand the components of a flowchart and be able to create a simple flowchart with emphasis on using different shapes for various operations.
Teaching Material[edit | edit source]
- Whiteboard and markers.
- Chart paper and markers.
- Individual sheets of paper and pencils for each student.

Introduction[edit | edit source]
- Start by asking students if they have heard of flowcharts and if they know their purpose.
- Briefly explain that flowcharts are visual representations of processes or algorithms.
- A flowchart is a type of diagram that represents a workflow or process.
- A flowchart can also be defined as a diagrammatic representation of an algorithm, a step-by-step approach to solving a task.
- The flowchart shows the steps as boxes of various kinds, and their order by connecting the boxes with arrows.
Basic Components:[edit | edit source]
- Introduce the basic components of a flowchart:
- Oval: Represents the start or end of a process.
- Rectangle: Represents a process or task.
- Diamond: Represents a decision point (yes/no question).
- Parallelogram: Represents input or output operations.
- Arrow: Represents the flow or direction of the process.
https://www.smartdraw.com/flowchart/flowchart-symbols.htm
Activity-Creating a Simple Flowchart:[edit | edit source]
- Choose a simple process (e.g., Calculate area of rectangle) and draw a flowchart on the whiteboard, incorporating all the components.
- Encourage students to ask questions and discuss the purpose of each shape.
- Have students practice drawing the flowchart on their individual sheets, focusing on using the correct shapes for each component.
Hands-On Practice:[edit | edit source]
- Ask students to create a flowchart for a process of calculate volume of cube in copy.
- Write an algorithm and draw a flowchart to print natural number from 1 to 10 and find their sum.
- Emphasize the use of different shapes for different components.
- Walk around the class to provide assistance and guidance.
Conclusion:[edit | edit source]
- Ask a few students to share their flowcharts with the class, pointing out the different components used.
- Summarize the key components: ovals for the start/end, rectangles for processes, diamonds for decisions, parallelograms for input/output, and arrows for the flow.
- Emphasize the importance of using flowcharts as a visual tool for understanding and planning processes.
Assessment[edit | edit source]
- Check the flowcharts from the students copy.
- Assess the flowcharts based on the correct use of components (ovals, rectangles, diamonds, parallelograms, and arrows) and the logical representation of the chosen process.